Posted on 3 Comments

KISS THE COOKIE! Peanut Butter Blossoms by Manjula Vijh

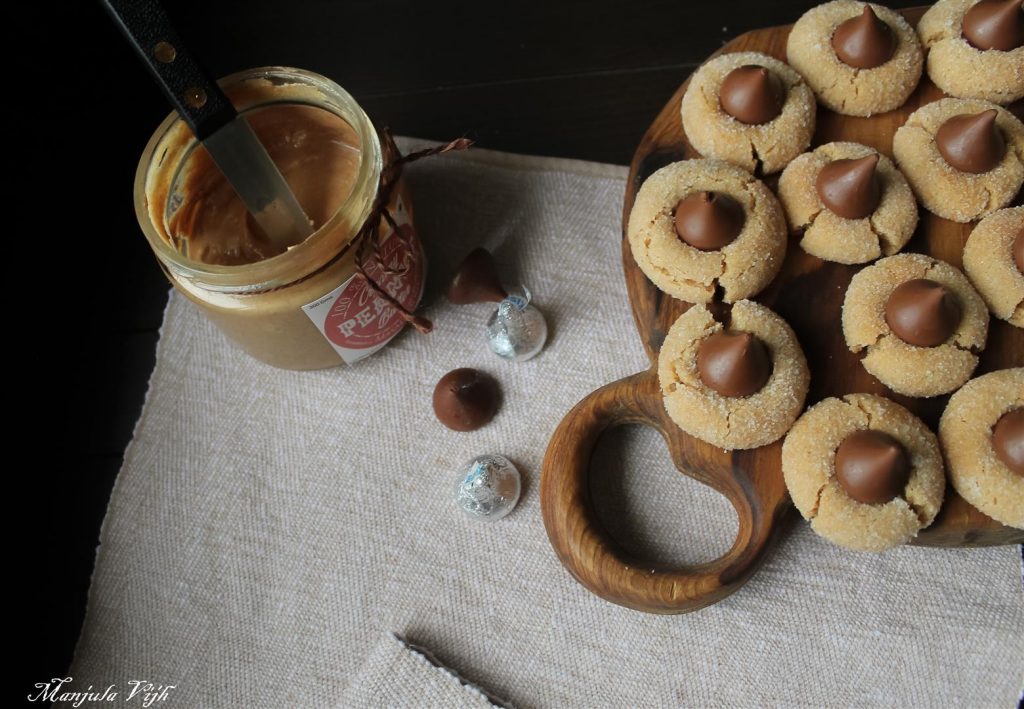
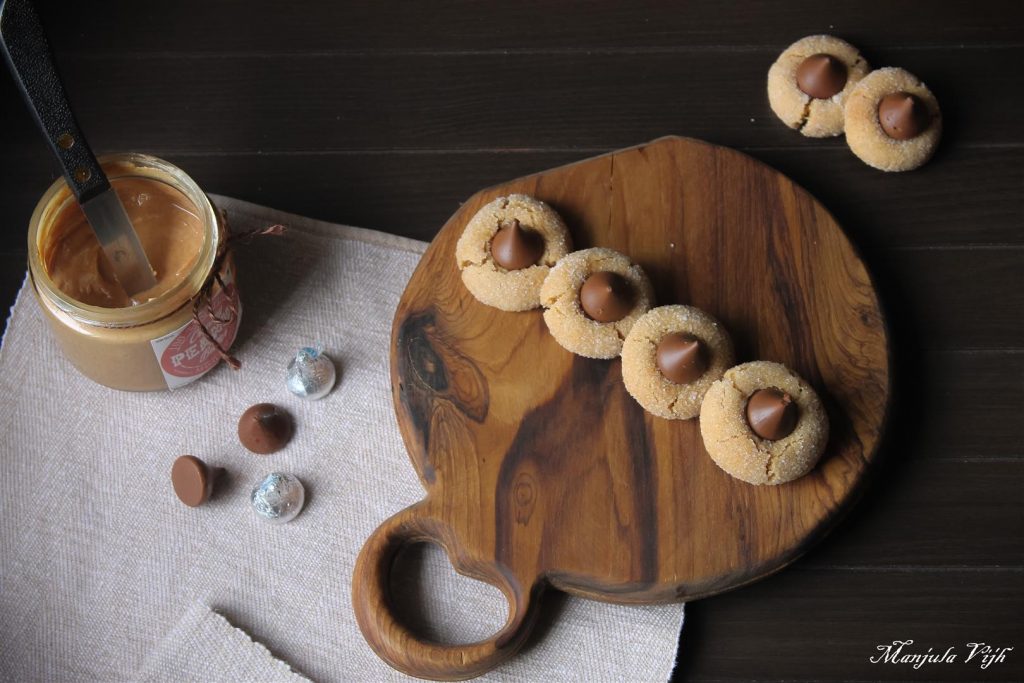
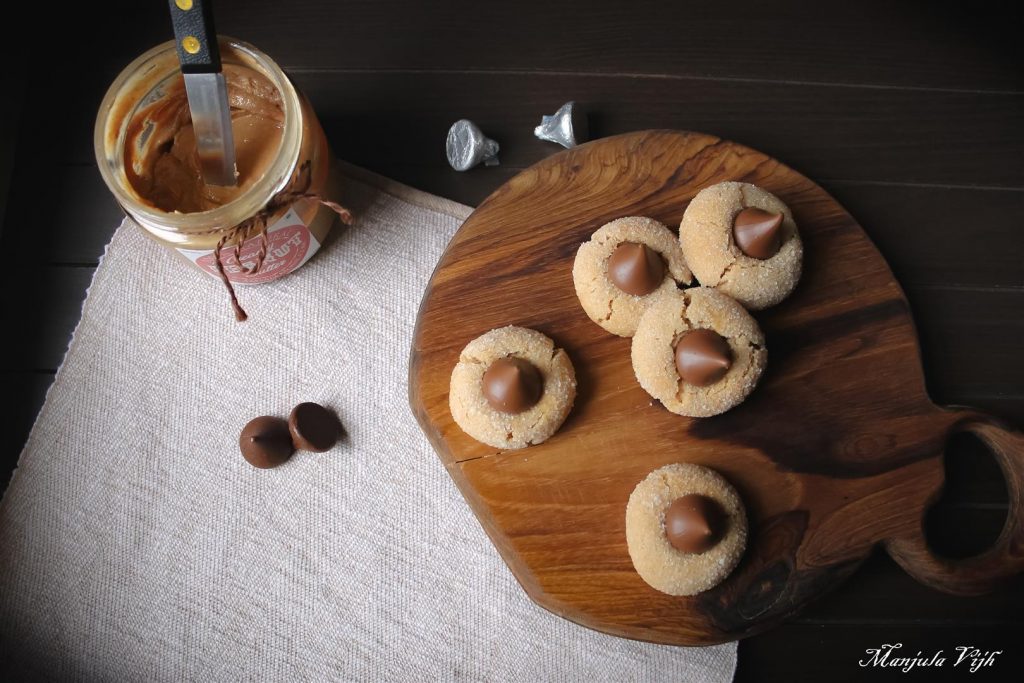
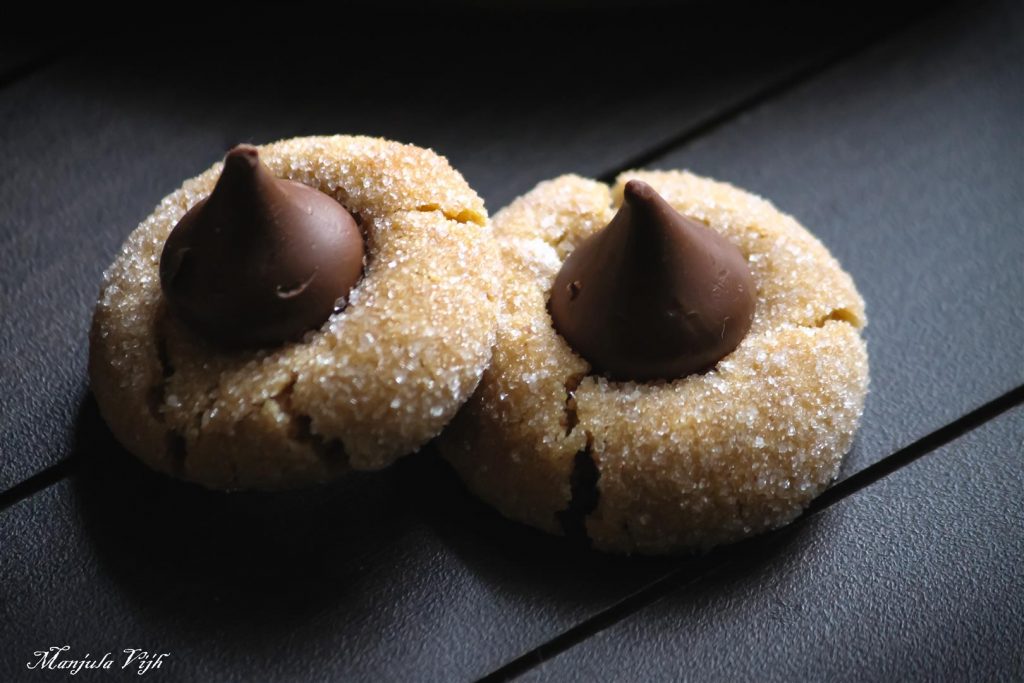
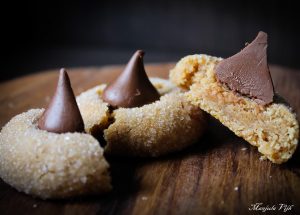
Traditionally called as “Peanut Butter Blossoms”, these are soft, chewy peanut butter cookies, rolled in sugar and then topped with a Hershey’s Kiss Chocolate!

Like the serving board? Check our range here : Good With Wood

It was during one lazy winter afternoon, while I was surfing the internet for some cookie recipes, that I came across these beauties. I had never worked with peanut butter as the main ingredient for cookies, but these looked so beautiful that I couldn’t resist giving them a try.

Like the serving board? Check our range here : Good With Wood

The recipe for these lovely looking cookies was first developed in 1957, by Mrs. Freda F. Smith of Gibsonburg, Ohio for the Ninth Grand National Pillsbury Bake-off competition. It’s an American classic recipe and many versions of this recipe are available online. My recipe is inspired from the one given on Hershey’s website, but since I am a vegetarian, I have modified the recipe to be an eggless one. These are chewy from the center and crisp from outside, and since these are topped with Hershey’s Kisses, I have named these cookies as, “Kiss the Cookie!”

Like the serving board? Check our range here : Good With Wood

When I first tried this recipe with one of my friends, I made them with store bought peanut butter. They came out nice but were little extra sweet. This time I tried them with the Natural Homemade Peanut Butter curated by Mr. Mohit Arora, which is available at Masala Monk. The peanut butter by Masala Monk has the right amount of salt and sugar unlike store bought peanut butter. The cookies came out to be perfect sweet and soft! They look lovely when presented and you can also gift them to your loved ones during festival time!

Like the serving board? Check our range here : Good With Wood

KISS THE COOKIE

Preparation time: 20 minutes

Cook time: 10 minutes

Serves:  40-45 cookies

Ingredients

  • Condensed Milk: 1 Can (400 gm.)
  • Peanut Butter: ¾ cup
  • All Purpose Flour: 1.5 cup
  • Baking Powder: 1tsp.
  • Butter(softened): ½ cup
  • Vanilla extract: 1tsp
  • Caster sugar for rolling the cookies: ½ cup
  • Hershey’s kisses: 40-45

Instructions

  1. In a medium bowl whisk together, flour and baking powder.
  2. In another bowl cream together, butter, peanut butter and vanilla to mix them well.
  3. Add the flour and make a dough. If, you are mixing with hands, and the dough sticks to your hand you can sprinkle some flour, apply butter to your hands and then again mix. You can taste the cookie dough too!! I did and it tastes great!
  4. Chill the dough to set. Cling wrap it and then keep it in the refrigerator for few hours.
  5. Preheat the oven at 190ºC.
  6. Shape dough into 1″-1.5″ balls, roll it in finely granulated caster sugar, and keep them into a baking tray.
  7. Bake the cookies at 190ºC for about 10-11 minutes, till cracks appear on sides. Do not over bake them. These cookies will not get brown in color.
  8. Meanwhile unwrap Hershey’s Kisses.
  9. After the cookies are baked, take out the baking tray, and gently press one kiss on each cookie. The warm cookies will melt the chocolate a little, but it will set after a while.
  10. Transfer the cookie onto a wire rack for cooling
  11. Store it in an airtight container.

Notes:

** Please check your oven temperature for baking.

** You can use a small ice-cream scoop, or a melon ball scoop to take out equally sized dough balls. I used one of my measuring spoons.

** You can keep the cookie dough cling wrapped for 2-3 days.

** If you want to cut down the recipe to half, you can do so. It works fine! I suggest to start with half the recipe if you are baking them for the first time.

** Use softened butter and not melted butter. I made this mistake and result was flat cookies.

** Chill the cookie dough before baking.

** If the chocolate falls of the cookie, you can dab little peanut butter on the bottom of the chocolate and press it back.

References:

http://www.post-gazette.com/life/food/2012/09/06/Cookies-Tracking-the-tale-of-a-favorite-the-Peanut-Blossom/stories/201209060264

https://abountifulkitchen.com/peanut-butter-blossoms/

http://americanheritagecooking.com/2014/12/peanut-butter-blossoms/

https://www.hersheys.com/kitchens/en_us/recipes/chewy-peanut-butter-blossoms.html

Posted on Leave a comment

Sweet Potatoes – Health, Nutrition and How to Use

Sweet potatoes, often overshadowed by their starchy counterparts, are finally having their moment in the nutritional spotlight. This vibrant root vegetable is not just a feast for the taste buds but also a cornucopia of health benefits, making it a must-have in your dietary arsenal. From their rich, earthy flavor to their impressive nutritional profile, sweet potatoes are the unsung heroes of the culinary world. Let’s dive deep into the world of sweet potatoes, exploring their health benefits, nutritional content, culinary versatility, and much more.


Sweet Potatoes: A Nutritional Powerhouse

Sweet potatoes are a nutritional powerhouse, packed with vitamins, minerals, fibers, and antioxidants. They are particularly rich in beta-carotene, which the body converts into vitamin A, crucial for maintaining healthy vision, skin, and immune function. But the goodness doesn’t stop there; these tubers are also loaded with vitamin C, potassium, and dietary fiber, all while being low in calories. This makes them an excellent ally in combating oxidative stress, supporting heart health, and promoting digestive wellness.

Unleashing the Health Benefits

  1. Immunity Booster: The high vitamin A content in sweet potatoes strengthens the immune system, making it more efficient at warding off infections.
  2. Heart Health Hero: With a significant amount of potassium, sweet potatoes help in regulating blood pressure levels, thus reducing the risk of heart disease.
  3. Weight Loss Wonder: High in fiber and water content, sweet potatoes keep you fuller for longer, aiding in weight management and appetite control.
  4. Glycemic Guardian: Despite their sweetness, sweet potatoes have a low glycemic index, making them a great choice for blood sugar regulation.
  5. Inflammation Inhibitor: The vibrant orange hue of sweet potatoes isn’t just for show; it’s a sign of the powerful antioxidants that help reduce inflammation throughout the body.

Culinary Creativity: Sweet Potatoes in the Kitchen

Sweet potatoes’ versatility makes them a star ingredient in any meal. From savory soups and salads to sweet desserts and smoothies, there’s no limit to how you can incorporate them into your diet. Here are a few ideas to get you started:

  • Morning Boost: Kickstart your day with a sweet potato breakfast hash, a perfect blend of savory flavors and nutritious goodness.
  • Lunch Delight: Toss roasted sweet potato cubes into your salads for a nutritious lunch that packs a punch.
  • Dinner Masterpiece: Sweet potato shepherd’s pie offers a comforting and healthy twist on a classic dish.
  • Snack Time: Sweet potato chips baked with a sprinkle of sea salt make for a crunchy, guilt-free snack.

Selecting, Storing, and Preparing

Choosing the perfect sweet potato is simple; look for smooth, firm skins and avoid any with soft spots or blemishes. Store them in a cool, dark place to preserve their freshness. When it comes to preparation, the possibilities are endless. Whether baked, boiled, steamed, or grilled, sweet potatoes retain their nutritional value and offer a delicious taste in every bite.


Sweet Potatoes in Folklore and Medicine

Sweet potatoes hold a place of honor in many cultures, not just as a food source but for their medicinal properties. They’ve been used to treat a variety of ailments, from inflammation to digestive issues, showcasing their importance in holistic health practices.

The Sweet Potato Challenge

In a world where diet trends come and go, the sweet potato stands the test of time. We challenge you to incorporate sweet potatoes into your meals for one week. Observe the changes in your health, energy levels, and overall well-being. We bet you’ll be pleasantly surprised!


Sweet potatoes are more than just a side dish; they’re a nutritional goldmine waiting to be explored. By incorporating these vibrant tubers into your diet, you’re not just enhancing your meals; you’re boosting your health, one delicious bite at a time. Embrace the sweetness and versatility of sweet potatoes and let them transform your culinary adventures and wellness journey.


Blog Tags: Sweet Potatoes, Superfood, Nutritional Benefits, Culinary Uses, Immune Boosting, Heart Health, Weight Loss, Blood Sugar Control, Anti-inflammatory, Healthy Recipes

Posted on Leave a comment

How to make Chips at home? 5 Fruits and Vegetables that can be made into Chips at home

In a world where snacking is almost a universal hobby, the quest for healthier options has led many to explore making their own chips at home. Masala Monk’s article provides a delightful guide on transforming fruits and vegetables into crispy, flavorful chips, offering a wholesome alternative to store-bought snacks. From the classic sweet potato to the unconventional beet, this guide not only introduces a variety of chip options but also emphasizes the benefits of homemade snacks, including the use of healthier ingredients, cost-effectiveness, and the joy of crafting unique flavor combinations.


The Art of Homemade Chips

Making chips at home is more than a culinary endeavor; it’s a journey towards healthier, more conscious eating. By selecting fresh and organic produce, you can avoid the additives and preservatives common in commercial snacks. The process itself, simple and engaging, becomes a pathway to understanding and appreciating the food we consume.

Top 5 Fruits and Vegetables for Homemade Chips

  1. Sweet Potato Chips: A nutritious alternative to traditional potato chips, sweet potatoes offer a rich source of fiber and vitamins. Thinly sliced and lightly seasoned, they bake into a crispy treat that’s both satisfying and healthy.
  2. Kale Chips: Kale transforms into a crunchy snack that’s impossible to resist. With a drizzle of olive oil and a sprinkle of sea salt, kale chips provide a nutrient-packed bite that supports your health goals.
  3. Apple Chips: For those with a sweet tooth, apple chips are a delightful choice. Cinnamon-topped and baked until crisp, they serve as a perfect snack or dessert that’s both tasty and beneficial.
  4. Carrot Chips: Carrot chips emerge as a vibrant and flavorful option, rich in beta-carotene and other essential nutrients. Their natural sweetness, enhanced with a hint of seasoning, makes for a deliciously crunchy snack.
  5. Beet Chips: Beets, with their deep color and earthy flavor, offer a unique twist on the homemade chip. Rich in antioxidants, they’re not only visually appealing but also packed with health benefits.

General Recipe for Homemade Chips

The process of making chips at home is straightforward and adaptable to a variety of fruits and vegetables:

  • Ingredients: 1-2 large fruits or vegetables of your choice, 1-2 tablespoons of oil (olive, coconut, or vegetable), and optional salt, pepper, or other seasonings.
  • Instructions: Preheat the oven to 350°F (180°C). Wash, dry, and thinly slice your chosen produce. Toss with oil and any desired seasonings, then spread in a single layer on a baking sheet lined with parchment paper. Bake until golden brown and crispy, about 10-20 minutes, depending on thickness.

Benefits of Homemade Chips

  • Healthier Ingredients: Control over oil type, salt level, and seasoning choices means you can enjoy chips that are as nutritious as they are delicious.
  • Cost-Effective: Making chips at home is often more economical than purchasing pre-packaged alternatives, especially if you buy produce in bulk.
  • Variety and Freshness: Experiment with different fruits and vegetables to discover new favorite snacks that are always fresh and free from preservatives.

Conclusion: A Crunchy Path to Healthier Snacking

Embracing the homemade chip revolution offers a creative way to enjoy your favorite fruits and vegetables, turning snack time into an opportunity for healthful indulgence. Whether you’re crafting a batch of sweet potato chips for movie night or experimenting with beet chips for a colorful appetizer, the possibilities are endless. So, preheat your oven and ready your slicer—it’s time to transform simple ingredients into extraordinary snacks that are sure to delight your taste buds and boost your health.


Blog Tags: Homemade Chips, Healthy Snacking, Fruits and Vegetables, Nutritious Snacks, Cooking at Home, DIY Chips, Healthy Eating, Oven-Baked Chips, Clean Eating, Snack Ideas

Posted on Leave a comment

Cheese and Chive Scones Recipe

woman in apron preparing food against light background

Welcome back, baking enthusiasts! Today, we’re exploring a bit off the beaten path, leaving behind the realm of sweet and venturing into the savory with an enticing twist on a classic English recipe: Cheese and Chive Scones. These scones are the perfect addition to a hearty breakfast, an ideal snack for a quick pick-me-up, or a tasty accompaniment to your favorite soup or salad. They’re also the perfect solution for those with a less sweet tooth but who still crave a satisfying treat with their afternoon tea.

What Makes Cheese and Chive Scones Special?

Unlike traditional scones, which are often sweet and served with clotted cream and jam, these savory scones are studded with sharp cheddar cheese and fresh chives. This combination offers an irresistible balance, with the rich, tangy cheese complementing the mild, onion-like taste of chives.

Cheese and Chive Scones are not just delectable, but also surprisingly easy to make, requiring only a handful of ingredients and a little time. They’re fantastic served warm, straight from the oven, but they cool well for later enjoyment too.

One of the best things about this recipe is its versatility. If you’re feeling adventurous or want a different flavor profile, the recipe is flexible. Add some cooked, crumbled bacon for Bacon Cheddar Chive Scones or swap the chives for chopped scallions for Cheddar Scallion Scones. The possibilities are endless!

Let’s Get Baking!

Without further ado, let’s get started on our Cheese and Chive Scones!

Ingredients

  • 3 cups (375g) self-rising flour
  • 1 cup (225g) cold butter, cut into small cubes
  • 1 cup (115g) cheddar cheese, grated
  • 3 tablespoons fresh chives, chopped
  • 1 cup (240ml) milk
  • 1 egg, for egg wash

Instructions

  1. Preparation: Preheat your oven to 220C/200C Fan/Gas 7 (425F) and line a baking sheet with parchment paper.
  2. Mix the Dough: In a large mixing bowl, combine the self-rising flour and cold butter. Use your fingers to rub the butter into the flour until the mixture resembles fine breadcrumbs.
  3. Add the Flavor: Stir in the grated cheddar cheese and chopped fresh chives.
  4. Form the Dough: Gradually add the milk, stirring with a fork until a dough starts to form. You might not need all the milk, so add it slowly to avoid making the dough too wet.
  5. Knead and Cut: Turn the dough out onto a lightly floured surface and knead it gently just a few times to bring it together. Roll out the dough to about 2cm thick and use a round cutter to cut out the scones. Arrange the scones on your prepared baking sheet.
  6. Final Touches: Beat the egg and use it to brush the tops of the scones. This will give them a beautiful, golden color as they bake.
  7. Bake: Bake the scones in your preheated oven for about 12-15 minutes, or until they’re golden brown and well risen.
  8. Cool and Serve: Allow the scones to cool on a wire rack for a few minutes before serving.

And there you have it, homemade Cheese and Chive Scones! A delicious alternative to sweet scone recipes. Whether you serve them for breakfast or enjoy them as a snack, they’re sure to be a hit!

Share your baking adventures with us using the hashtags #CheeseChiveScones, #Baking, #EnglishScones, and #HomemadeScones. We can’t wait to see your creations!

Stay tuned for more delectable recipes, and happy baking!

Blog Tags: Cheese and Chive Scones, Baking, English Scones, Homemade Scones, Savory Scones, Cheddar Cheese, Chives, Quick and Easy Recipes, Breakfast Ideas, Snack Recipes, Versatile Baking, Cheddar and Chive Scones, Cheddar Scallion Scones, Bacon Cheddar Chive Scones

Posted on Leave a comment

Easy English Scone Recipe

food man people woman

The humble scone: a basic yet versatile bakery delight that’s been a cherished part of British culinary tradition since its Scottish birth. Now a centerpiece in the beloved English afternoon tea, this simple pastry has won hearts globally with its tender, crumbly texture and perfect balance of flavors.

What Makes English Scones Special?

Distinct from the sweet, varied-flavor scones of America, the traditional English scone is typically plain or dotted with currants. The scone’s charm lies in its modesty – a circular, slightly sweet delight baked to golden perfection. Its tender, crumbly texture makes it an ideal companion for clotted cream and strawberry jam, in a combo popularly known as a “cream tea”. English scones serve as a neutral, yet satisfying canvas allowing the harmonious marriage of cream and jam to take center stage.

The Tradition of English Scones

The custom of baking and relishing scones is entwined with the English tradition of afternoon tea, dating back to the 1840s. The habit, initiated by Anna, the Duchess of Bedford, intended to bridge the hunger gap between lunch and a late dinner. Now, it’s an integral part of British culture, replete with finger sandwiches, a variety of cakes, pastries, and, of course, scones served with clotted cream and jam.

Let’s dive into the recipe of a traditional English scone and explore its delectable variations, accommodating varied dietary needs and preferences.

1. Traditional English Scone Recipe

Whip up a classic English scone with these simple ingredients and steps:

Ingredients:

  • 3 cups all-purpose flour
  • 1/2 cup sugar
  • 5 teaspoons baking powder
  • 1/2 teaspoon salt
  • 3/4 cup (1 1/2 sticks) unsalted butter, chilled and cut into small cubes
  • 1 cup whole milk
  • 1 egg
  • 1 teaspoon pure vanilla extract

For the egg wash:

  • 1 egg beaten with a splash of milk

Instructions:

  1. Preheat your oven to 200°C (approximately 392°F) and line a baking tray with parchment paper.
  2. In a large bowl, combine the flour, sugar, baking powder, and salt.
  3. Add the cold, cubed butter to the flour mixture. Use your fingers, a pastry cutter or a food processor to work the butter into the flour until the mixture resembles coarse crumbs.
  4. In a separate bowl, whisk together the milk, egg, and vanilla extract. Gradually add this to the flour mixture, stirring until just combined. Remember, overmixing can lead to tough scones.
  5. Turn the dough out onto a lightly floured surface and knead it gently a few times to bring it together.
  6. Pat the dough into a rectangle about 1 inch thick. Using a round biscuit cutter (or a glass), cut out scones from the dough and place them on the prepared baking tray. You can re-roll the scraps to cut out more scones.
  7. Brush the tops of the scones with the egg wash.
  8. Bake in the preheated oven for 15-20 minutes or until the scones are golden brown.
  9. Allow the scones to cool on the tray for a few minutes, then transfer them to a wire rack to cool further.
  10. Serve warm with clotted cream and strawberry jam, or simply butter.

Enjoy your homemade traditional English scones with this Easy Recipe!

Variations

2. Vegan Scones – In a compassionate twist on the classic, replace butter with coconut oil and use plant-based milk. You can even replace the traditional egg wash with a simple brush of almond milk for a golden finish.

3. Gluten-Free Scones – Perfect for those with dietary restrictions. Replace regular flour with a mix of almond and coconut flour. A hint of xanthan gum will keep your gluten-free scones springy and delicious.

4. Cheese and Chive Scones – Transform the humble scone into a savory delight. Add grated sharp cheddar and finely chopped chives to your basic scone mixture. Serve warm with butter for a satisfying snack or as a side to a hearty soup.

5. Blueberry Scones – Introduce a fruity twist to the classic scone. Fold in fresh blueberries to your scone dough for a burst of sweet and tart flavors with every bite.

6. Lemonade Scones – Intriguing and surprisingly delightful, lemonade scones are exceptionally light and fluffy. The lemonade offers a subtle sweetness and hint of citrus to these novel scones.

Frequently Asked Questions

  1. What are English Scones?
    • English scones are a type of baked goods that originated in the United Kingdom. They are often lightly sweetened and typically served with clotted cream and jam.
  2. How are English Scones different from other types of scones?
    • English scones are generally less sweet and more dense than American scones. They are usually plain or have currants or raisins added in, while American scones often come in a variety of flavors and can be packed with mix-ins like berries or chocolate chips.
  3. When are English Scones traditionally made and served?
    • English scones are traditionally made and served for afternoon tea, a British custom that usually takes place around 4pm. However, they can also be enjoyed for breakfast or brunch.
  4. Can I make English Scones vegan?
    • Yes, it’s possible to make vegan English Scones by replacing the dairy milk with a plant-based milk and using a vegan butter substitute or coconut oil instead of traditional butter.
  5. Can I add fruits to my English Scones?
    • Absolutely! You can customize your English Scones with a variety of fruits such as blueberries, strawberries, or apples. You can also add dried fruits like raisins or currants.
  6. What is the best way to serve English Scones?
    • English Scones are best served warm with clotted cream and strawberry jam. You can also serve them with butter or whipped cream.
  7. Can I make these scones gluten-free?
    • Yes, you can make gluten-free scones by using a gluten-free flour blend. Just make sure to blend is meant for baking and that it contains xanthan gum, which helps with texture and rise.
  8. How long do homemade English Scones last?
    • Homemade English Scones can last for up to two days when stored in an airtight container at room temperature. For longer storage, you can freeze them for up to three months.
  9. Can I reheat my English Scones?
    • Yes, to reheat English Scones, warm them in a preheated 350°F oven for about 10 minutes.
  10. I’m following a keto diet. Can I still make English Scones?
    • Yes, to make keto-friendly English Scones, you can substitute regular flour with almond flour or coconut flour and replace the sugar with a low-carb sweetener.

From vegan to gluten-free, fruity to savory, scones offer endless possibilities. Their versatility ensures there’s a variant to satisfy every palate and dietary preference. Whether it’s a soft, fluffy scone to accompany your afternoon tea, a healthy oatmeal scone for a quick breakfast, or a savory cheese scone to serve with a winter soup, mastering the art of scone-making offers a world of culinary delights.

Embrace the tradition, master the basic recipe, and let your imagination guide your scone variations. Happy baking!